Author: Jonathan Warren, MD (Clinical Ultrasound and EMS Fellow, Department of Emergency Medicine, Harbor-UCLA Medical Center) and Lilly Bellman, MD (Pediatric POCUS Director, San Francisco Emergency Medicine Associates, California Pacific Medical Center) // Reviewed By: Steve Field, MD; Brit Long, MD (@long_brit)
Case:
A 41 year old male presents to the ED with right upper quadrant pain that worsens after eating. While performing the right upper quadrant ultrasound, you notice something that looks like the liver sitting above the diaphragm. You wonder if the patient has concomitant lower lobe pneumonia or if the ultrasound machine is broken.
Introduction
Point-of-care ultrasound (POCUS) is a crucial tool in the emergency physician’s toolkit, and understanding how to perform POCUS requires a familiarity with the physics behind it and interpretation of the artifacts you may see. It is important to recognize and identify these artifacts to avoid missing any crucial pathology or diagnosing pathology that isn’t there. Sometimes it feels like you have to be a master physicist to understand the cause of artifacts, but we’ll try to break it down for all to understand without a physics degree.
Why are there artifacts?
Before we can understand the different artifacts, we need to understand why we get artifacts in the first place. Ultrasound utilizes sound waves created in piezoelectric crystals located in the US probe, which reflect upon surfaces in the body and are interpreted into an image utilizing computer algorithms. An electric current is applied to the crystals to generate the initial sound wave, the crystals then “listen” for the echoes which interact with the crystals to generate an electric signal to the computer. Predefined computer algorithms then correlate time of reflection and intensity into an image on the screen.
The generation of these images from reflected sound waves relies on specific assumptions. Violation of these assumptions results in the observed artifacts seen when conducting an ultrasound scan. What are the five assumptions made?1,2
- Attenuation is constant over the depth of traveled sound.
- Sound waves travel in a straight line to and from the object.
- Echoes return after a single reflection on an object
- Speed of sound is constant through different tissues
- There is only one straight beam from the probe that generates echoes
When you are scanning a patient, you will begin to notice artifacts that arise as a result of normal physics which do not follow the above assumptions. Having the ability to notice this and why they occur will allow you to better understand the images you see. As you learn about the various artifacts, some will be labeled as advanced. These indicate more complex to understand mechanisms and are not as essential to master for everyday POCUS.
Violation: Attenuation is constant
Attenuation, meaning the weakening of sound (decreased amplitude) as it traverses different tissue, is affected not only by the frequency of sound produced by the probe, but also by the density of the tissue in which it travels.3 In general, the ultrasound machine assumes a uniform decrease in signal regardless of the type of tissue.2 However, tissues in the body have a variety of densities which attenuate at different rates, and water (and simple fluid) and calcifications are on the extremes of this scale, leading to common artifacts we see on ultrasound.
1. Shadowing
When sound waves encounter an object with very high density, such as a calcification, there is strong attenuation from the object. At extremes, almost no sound waves pass through the dense object and thus it appears black beyond it. This artifact is frequently seen in imaging of ribs or gallstones.
 .
. 
(image – multiple gallstones present within the gallbladder)
How does this affect your scanning?
![]() Shadowing may obscure structures deep to the hyperechoic object.
Shadowing may obscure structures deep to the hyperechoic object.
![]() Shadowing may be helpful in identifying calcifications, gallstones, or kidney stones.
Shadowing may be helpful in identifying calcifications, gallstones, or kidney stones.
2. Enhancement
Conversely, when sound waves encounter an object with near zero attenuation such as simple fluid, there is next to no attenuation through the time traveled through that medium. This presents on the image as increased echogenicity beyond the structure with low attenuation. Frequently due to the location, this is called posterior acoustic enhancement and seen when imaging the bladder, gallbladder, or large vessels.


(image – posterior acoustic enhancement deep to the bladder)
How does this affect your scanning?
![]() The posterior enhancement may result in decreased resolution or identification of structures or fluid deep to the fluid filled objects.
The posterior enhancement may result in decreased resolution or identification of structures or fluid deep to the fluid filled objects.
Violation: Sound waves travel in a straight line
The ultrasound machine assumes that sound travels in a direct linear path from the probe through to reflectors and then returns along a straight path back to the probe. However, due to the beam encountering areas of high contrast between density of tissues and characteristics of waves, they may change the direction of travel resulting in a multitude of artifacts when the waves do not return in the expected straight path.
1. Edge Artifact
When sound encounters the edge of a curved reflector, it results in diffraction of the beam (change of direction). These resultant sound waves, now traveling at different angles, may not return the probe as expected. They are then interpreted as a decrease in intensity and appear as shadowing distal to the curve of a structure.4 While this does not necessarily hinder observation of the structure itself, objects deep to the structure may now be hidden by shadowing or be confused for the presence of a calcified structure such as a gallstone.


(image – short axis of the gallbladder demonstrating edge artifact)
How does this affect your scanning?
![]() Shadowing may obscure structures deep to the hyperechoic object.
Shadowing may obscure structures deep to the hyperechoic object.
![]() This type of artifact can be confused for gallstones or other calcified structures.
This type of artifact can be confused for gallstones or other calcified structures.
![]() Edge artifacts can make it difficult to take accurate measurements of some structures such as optic nerve sheath diameter.
Edge artifacts can make it difficult to take accurate measurements of some structures such as optic nerve sheath diameter.
2. Refraction (Displaced Anatomy) Artifact [Advanced]
When sound waves encounter a tissue of a significantly different density at a non-perpendicular angle, the angle of incidence changes such that the angle may “reflect” off this new surface. If this refracted beam hits a reflective object and returns to the probe, the ultrasound interprets the path in a linear fashion causing a lateral displacement of the visualized object.1 This is a more advanced artifact that you may not be as likely to encounter.

How does this affect your scanning?
![]() This artifact may result in displacement of structures you are visualizing. By fanning the probe and viewing objects in multiple axes, you can better understand the true location of imaged structures.
This artifact may result in displacement of structures you are visualizing. By fanning the probe and viewing objects in multiple axes, you can better understand the true location of imaged structures.
3. Anisotropy
When sound waves encounter a highly reflective object at an oblique angle, the resultant reflection (similar to that of a light wave hitting a mirror at an angle) makes an object appear less echogenic on screen depending on the angle.3,5 If the probe is angled to a perpendicular angle, the artifact is reduced and the object returns to its normal echogenicity. You may think of it similar to playing basketball, if you are dribbling the ball (sound wave) perpendicular to the ground, it will come right back to you, but if you dribble it at an angle, then it will be a bounce pass to elsewhere in the gym. This artifact is frequently seen in tissue which has multiple linear reflectors such as muscle and tendon and may be confused for pathology or be used to identify nerves.

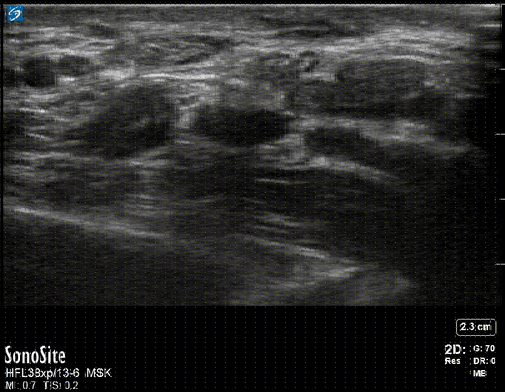
Legend: The linear structure represents muscle or tendon. When a tendon is scanned from an angle the structure appears hypoechoic (dark), but when scanned perpendicular the image appears hyperechoic (light). You can see this demonstrated in the gif with the tendons starting hypoechoic, becoming hyperechoic and the probe fans, and then back to hypoechoic.
(image – fanning through the tendon sheaths at the level of the wrist, the median nerve is visible in the middle of the image)
How does this affect your scanning?
![]() Anisotropy of tendons may be confused for full thickness muscle or tendon tears due to loss of sound waves.
Anisotropy of tendons may be confused for full thickness muscle or tendon tears due to loss of sound waves.
![]() Anisotropy may make it difficult to identify nerves during nerve block procedures if the probe is not held properly.
Anisotropy may make it difficult to identify nerves during nerve block procedures if the probe is not held properly.
Violation: Echoes return after a single reflection
Ultrasound computational models are based on the assumption that each generated sound wave has one single reflection that returns to the transducer and ends there. However, the nature of sound waves is that on each surface, including the probe itself, waves may continue to reflect further thus resulting in artifacts.
1. Reverberation Artifact
Reverberation artifacts are caused when sound waves travel between a highly reflective object and a closer reflector (often the probe itself), resulting in one or more echoes of an object at equally spaced intervals (multiples of the space to reflective object). That is, the machine interprets subsequent waves as deeper structures due to the increased time to return to the probe.2 Frequently, this may be seen as A-lines in the lung or metal objects like needles. Comet tails that you may see along the pleural lining or in the gallbladder with adenomyosis are a subset of reverberation artifacts.


(image – imaging of the pleura demonstrating multiple A-lines)
How does this affect your scanning?
![]() Can be used to help you identify your needle in the longitudinal axis or identify metallic foreign bodies
Can be used to help you identify your needle in the longitudinal axis or identify metallic foreign bodies
![]() Is a key finding during lung ultrasound
Is a key finding during lung ultrasound
![]() May at times obscure other pathology as it overlaps with actual structures.
May at times obscure other pathology as it overlaps with actual structures.
2. Ring Down Artifact
Ring down artifact is a special type of reverberation that occurs when two reflectors are exceptionally close to each other, resulting in a seemingly infinite number of reverberations. This often appears as a hyperechoic line deep to the object that is causing it. It can frequently occur by the resonance of small gas bubbles or fluid filled bubbles where additional sound is emitted. Frequently, this artifact is seen as B-Lines in pulmonary edema.1,4


How does this affect your scanning?
![]() B-lines are a key finding for pulmonary edema when performing lung ultrasound
B-lines are a key finding for pulmonary edema when performing lung ultrasound
3. Mirror Artifact
Mirror artifact is another specific example of reverberation that occurs when sound waves hit a strong reflector (“mirror”) causing the sound wave to pass through an object twice. The ultrasound interprets this reflection as occurring beyond the reflective surface and creates a mirror image in that location. The mirror and true object will be equally distant from the “mirror” and will even display inverse doppler flow if a doppler gate is applied.1,2,4 Frequently, this is seen on hepatic ultrasound when sound waves encounter the diaphragm.


(image – Imaging of the left upper quadrant with mirroring. Note how the echotexture of the spleen seems present across the diaphragm)
How does this affect your scanning?
![]() Mirror artifacts may be confused for consolidated lung when performing lung or FAST exams. You may differentiate these with visualization of the spine as increased lung density will allow the soundwaves to penetrate and allow visualization of the spine. With mirror artifact, you should not be able to see the spine because the air in the lung scatters the soundwaves.
Mirror artifacts may be confused for consolidated lung when performing lung or FAST exams. You may differentiate these with visualization of the spine as increased lung density will allow the soundwaves to penetrate and allow visualization of the spine. With mirror artifact, you should not be able to see the spine because the air in the lung scatters the soundwaves.
![]() At times may display objects on ultrasound that are not there and can be confused for additional blood vessels or structures.
At times may display objects on ultrasound that are not there and can be confused for additional blood vessels or structures.
Violation: The speed of sound is constant [Advanced]
1. Speed Displacement Artifact [Advanced]
Ultrasound assumes the speed of sound is constant at 1540 m/sec, but this can be influenced by different tissues thus, violating that assumption. This can alter the appearance of a structure (typically the edge) or can make the object appear to be displaced. The machine makes the assumption that speed is constant and thus, the time to return to the probe is equivalent to the distance traveled. Thus in tissues where there are significantly different densities, the border of the organ may appear posteriorly displaced or discontinuous.1 Though frequently seen in the liver, this could result in the appearance of a fracture in bones as well.


Legend: The shadowed black box represents fat within the liver (rectangular border) where sound travels more slowly. The ultrasound does not account for the change in velocity and thus “sees” the far-field edge of the liver as more distal and discontinuous with the rest of the box.
(Image: arrows demonstrate RUQ with Speed Displacement Artifact)
How does this affect your scanning?
![]() This artifact may displace aspects of the liver and can be confused for scalloping of cirrhosis.
This artifact may displace aspects of the liver and can be confused for scalloping of cirrhosis.
Violation: There is only one straight beam from the probe that generates echoes
Ultrasound assumes that there is one beam that comes out of the probe and that this beam is uniform in size and resolution along its entire length. However, the emitted beam isn’t truly singular and has a more complex shape with “lobes” of the beam that are present and can influence images. Furthermore, the main beam is closer to hourglass in shape, where the “waist” corresponds with the focal zone where resolution is the highest.

1. Beam Width Artifact [Advanced]
Beam width artifact is a complication that occurs when objects outside of the focal zone of the main ultrasound beam (as assumed) causes echo overlay onto an image that is being scanned. This may cause the image to appear as one structure when spatially there are two distinct objects.1,3 You may avoid this artifact or confusion by using the best practice of centering objects of interest in the middle of the screen (typically the focal depth of the probe) or, on more advanced machines, adjusting the focal zone itself.

How does this affect your scanning?
![]() Inappropriate positioning of the focal point results in poor spatial resolution when identifying smaller structures.
Inappropriate positioning of the focal point results in poor spatial resolution when identifying smaller structures.
2. Side Lobe Artifact [Advanced]
Side Lobe Artifact (or Grating Lobe) occurs when an object captured by low amplitude waves of one of the off-axis beams encounters an object outside of the intended beam’s path. The machine assumes these reflections come from the main beam and places the object in that path.1 Most commonly this is seen as hyperechoic objects visualized within the bladder or eye. Frequently this artifact is seen in fluid filled structures because the isoechoic images overlayed by the side lobe are more obvious with the anechoic background. Depth or angle adjustments as well as scanning in multiple planes and optimizing the focal zone can help to either reduce or identify artifactual structures as such to better understand them and reduce confusion.


(image – sagittal view of the bladder with evidence of side lobe artifact denoted by the arrow)
How does this affect your scanning?
![]() Side lobe artifacts may project as artifactual hyperechoic structures overlaid on anechoic structures. This may be confused for vitreous hemorrhage or foreign body in the eye, or even as vegetation in the heart6.
Side lobe artifacts may project as artifactual hyperechoic structures overlaid on anechoic structures. This may be confused for vitreous hemorrhage or foreign body in the eye, or even as vegetation in the heart6.
![]() You can minimize this artifact by changing the depth of the probe (which changes the focal zone) and imaging through a structure in multiple axes.
You can minimize this artifact by changing the depth of the probe (which changes the focal zone) and imaging through a structure in multiple axes.
Best Practices for Scanning
- Always set the depth and gain at the appropriate level for the structure you are attempting to image.
- Images all structures in question in at least two axes to minimize confusion from artifacts.
Case Conclusion:
Utilizing your knowledge of artifacts in ultrasound, you realize what you previously thought may have been pneumonia was in fact a mirror artifact and a reflection of the liver. You finish your ultrasound and diagnose your patient with cholelithiasis after seeing shadow artifacts from his gallstones.
References:
- Feldman MK, Katyal S, Blackwood MS. US artifacts. Radiogr Rev Publ Radiol Soc N Am Inc. 2009;29(4):1179-1189. doi:10.1148/rg.294085199
- Quien MM, Saric M. Ultrasound imaging artifacts: How to recognize them and how to avoid them. Echocardiogr Mt Kisco N. 2018;35(9):1388-1401. doi:10.1111/echo.14116
- Shriki J. Ultrasound physics. Crit Care Clin. 2014;30(1):1-24, v. doi:10.1016/j.ccc.2013.08.004
- Edelman S. Understanding Ultrasound Physics. Fourth Edition. ESP Ultrasound, LLC; 2012.
- Taljanovic MS, Melville DM, Scalcione LR, Gimber LH, Lorenz EJ, Witte RS. Artifacts in musculoskeletal ultrasonography. Semin Musculoskelet Radiol. 2014;18(1):3-11. doi:10.1055/s-0034-1365830
- Bertrand PB, Levine RA, Isselbacher EM, Vandervoort PM. Fact or Artifact in Two-Dimensional Echocardiography: Avoiding Misdiagnosis and Missed Diagnosis. J Am Soc Echocardiogr. 2016;29(5):381-391. doi:10.1016/j.echo.2016.01.009