Authors: David Cisewski, MD (@dhcisewski– EM Resident Physician, Icahn School of Medicine at Mount Sinai); Andres Arredondo, MD MSc (EM Resident Physician, Icahn School of Medicine at Mount Sinai) // Edited by: Stephen Alerhand, MD (@SAlerhand); Alex Koyfman, MD (@EMHighAK); Brit Long, MD (@long_brit); and Manpreet Singh, MD (@MprizzleER)

Used with permission of http://www.gregadunn.com/
Over the last decade, peripheral nerve blocks (PNB’s) have gained significant attention as part of a multimodal approach to pain management. However, before getting started, it important to consider the safety precautions necessary when performing these blocks. Fortunately for us, many of the leaders in the ED-based nerve block community have been speaking out on this exact subject and providing guidance. The purpose of this article is to summarize many of the recommendations on ultrasound-guided nerve block (USGNB) sterility and safety in the ED, as well as provide a cost-effective model for practicing these on your own.
How sterile do these nerve blocks have to be?
You are inserting a foreign body into tissue and potentially a blood vessel (though hopefully not – more on this to come)… the short answer, “ASAP (As Sterile As Possible)”. In January 2019 Michelle Lin and Dan Mirsch covered this topic in an excellent discussion on Ultrasound Guidance and Peripheral IV Sterility. Though this discussion focused on peripheral intravenous (IV) insertion, there is no reason we cannot practice the same sterility techniques for USGNB’s as well. A few major points covered in this discussion:
- Chlorhexidine – Always sterilize the skin surface with chlorhexidine prep prior to each block.
- Skip the Tegaderm – Tegaderm is designed to prevent moisture buildup, which means huge pore size that allow all sorts of viruses and pathogens (e.g. HCV, HBV, HIV) to cross from transducer to patient when used as a transducer cover. Additionally, Tegaderm may also damage the crystals on your US transducer. Skip the Tegaderm all together and use a transducer cover (or sterile alternative; see next point).
- Transducer cover alternatives – The sterile probe cover is great and covers the US probe and cord–but it is expensive (~$7). At only $1.50, consider a sterile glove as a safe and cost-effective alternative in performing these blocks. Just slip the US probe into the cuff and tie it off with the glove fingers.
- Single-use gel packs – Standard bottle gel used for non-invasive US exams is ripe with skin flora from every patient that was scanned before yours; single-use packets are sterile, cost-effective, convenient, and single-use. Consider it your go-to whenever sticking a needle in a patient.

Great, I am sterile…. Can I block now?
Similar to every procedure in medicine, you must first consider the steps involved, foresee any complications, and know what steps can be performed to maximize safety. Foremost in this consideration is an assessment of the anesthetic used and a calculation of accepted (and maximum) dosing.
There are a lot of percentages and numbers on these anesthetics…this sound like math…… can I just estimate the amount of analgesia used?
No. Anesthetics for all intents and purposes are cardiac poisons and should be handled as such. There are phenomenal resources out there that do this math for you (see Highlands anesthetic table), so there’s no reason to skimp.

Local Anesthetic Dosing for Regional Anesthesia. Consider an estimated weight-based approach when calculating the estimate maximum dose used for each anesthetic. (Used with permission from Highland Ultrasound).
Or you can do your own math…. (Example use calculation: 1% lidocaine = 1g/100ml = 10mg/ml; 7 mg/kg max x 70 kg patient = 490 mg; 490mg @ 10mg/ml = 49 ml 1% lidocaine).
Can I just stick to lidocaine for nerve blocks?
You can, but it is important to note that not all anesthetics are created equally. “Know your ‘caines” – short-acting anesthetics (chloroprocaine/lidocaine) have a better safety profile than long-acting lipophilic anesthetics (ropivacaine/ bupivacaine) that have a strong affinity for the sodium gated channels of the CNS and myocardium, especially when injected intravascularly. Duration of required block should also be considered. Among patients requiring pain control, the use of long-acting anesthetics (ropivacaine, bupivacaine) would be preferred; for procedural anesthesia, use short-acting anesthetics (lidocaine) due to a decreased duration of need. Due to the risk of local anesthetic systemic toxicity (see below), novice providers may consider sticking with lidocaine when starting out.
These different percentages seem to imply different volumes…. Is there an ideal amount of anesthetic I should be using?
This depends on how and what you are blocking. Volume can be adjusted by using anesthetics of varying concentrations (e.g. 1% v 2%). Consider using dilute solutions (lower percentages) with higher volumes for plane blocks (to optimize distribution throughout the plane) and concentrated solutions with low volume for peripheral blocks. Remember, “quality in the periphery, quantity in the planes.” Peripheral blocks can achieve affect with as little as 5-10 cc 2% lidocaine, whereas fascial blocks (fascial iliaca, transverse abdominus plane) rely on the distribution of anesthetic across the fascial plane and may require up to 30-40 cc of low-concentration anesthetic.
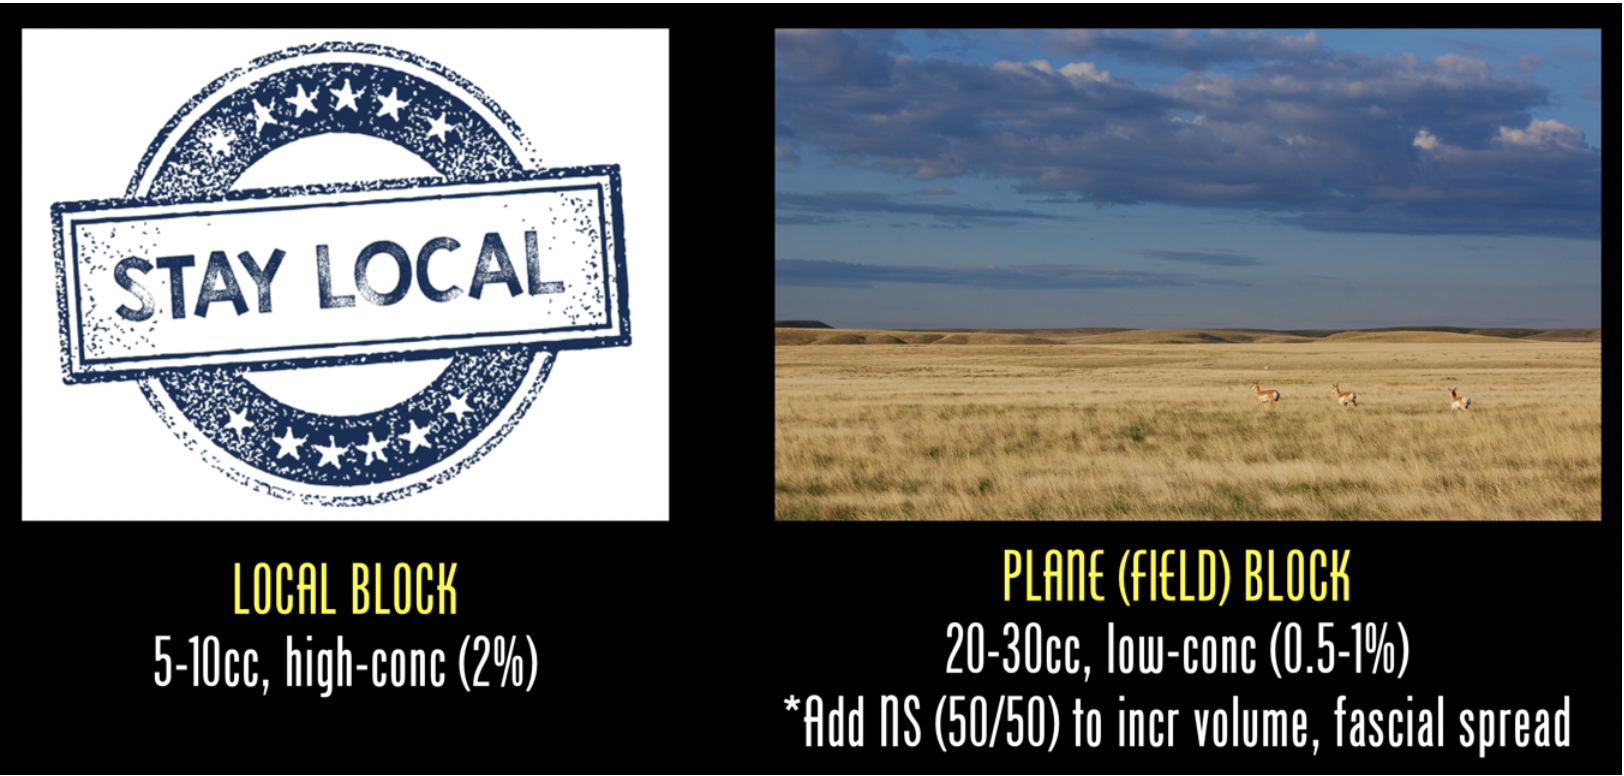
Anesthetic volume. For local (peripheral) blocks consider 5-10 cc of high-concentration anesthetic. For plane (field) blocks which rely of fascial spread, consider 20-30cc anesthesia (consider adding normal saline in a 50/50 mixture in increase injectate volume).
Is there any risk of nerve injury in performing these blocks?
Yes. Peripheral nerve injury (PNI) does occur in a small percentage of patients, though with 95% resolving within 6 weeks and 99% resolving within one year. You want to ‘block it, not break it.’ In their latest publication, Nagdev, et al provide a number of tips to avoid PNI:
- Do not force it – Be cautious of high-resistance when injecting anesthetic, as this could be an indication of intraneural injection. Back away, visualize the tip, aspirate, try again.
- Start low, go slow – Deliver a small volume injection slowly outside the perineurium with low pressure, stopping immediately if severe pain with injection. If you are not seeing an anechoic bubble forming, stop what you are doing, find your tip, and restart.
- Watch the tip – Do not advance the needle or inject without visualization of the needle tip.
- Keep to the planes – A “stay away” approach is advised for novice blockers by targeting anesthetic injection into the fascial planes that contain the targeted nerve but lowers the risk of intraneural injection. Consider using normal saline to perform a pre-block hydro-dissection until you are sure your needle is in the right place – inject a small amount of normal saline and once fascial spread is visualized, transition over to your anesthetic.
- Be blunt – despite limited evidence to support either sharp versus blunt, consider using blunt-tip needles to avoid axial dissection (inject a small wheal of lidocaine at the skin surface using a subcutaneous insulin injector to avoid the pain of cutaneous needle insertion).
- Avoid neuropathics – Avoid USGNBs in patients with pre-existing neurologic deficits (either baseline or from the acute injury) and when unable to perform a clear neurologic examination (obtunded, intoxicated). **Remember: all patients who undergo a block should have a clearly documented neurologic exam performed before and after the block.
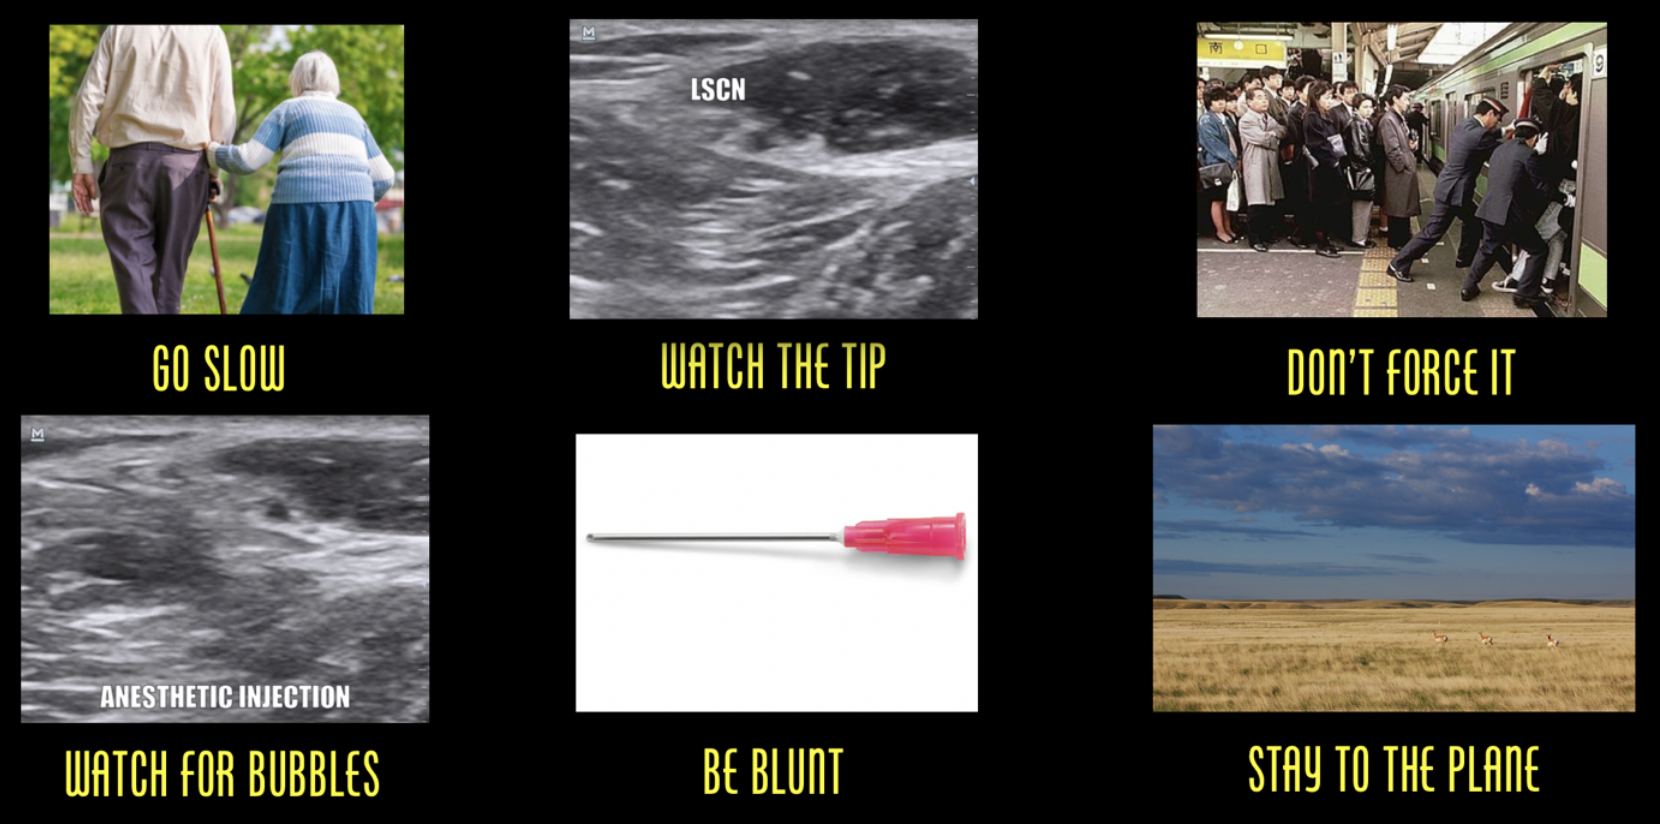
Avoid peripheral nerve injury. Go slow, always visualize the needle tip, don’t force against a path of resistance, when injecting watch for an anechoic bubble formation, use blunt needle tips, take a “stay away” approach or stay to the plane.
Anything I should watch out for in performing nerve blocks to treat pain from limb fractures?
Nerve blocks are commonly used for fractures, and most fractures come with the risk of acute compartment syndrome. For more on compartment syndrome, see this emDocs post. Nagdev, et al recommend the following tips when in performing USGNB’s in patients at risk of acute compartment syndrome:
- Talk to Ortho – Have a clear discussion to ensure they are on board with USGNB pain management and they are aware of the initial compartment pressures.
- Choose short-acting anesthetics – Use a short-acting agent (lidocaine) to allow for early, repeated assessments for progressing compartment pressure and repeat neuro exams.
- Serial exams – Early re-evaluation or use an intra-compartment pressure monitor to assist in the early diagnosis of acute compartment syndrome; ensure patient is aware of the warning signs (pain, paresthesia).
Any OTHER complications I should watch out for?
“LAST but not least” …… you should always be aware of local anesthetic systemic toxicity (LAST). This can be prevented with the following recommendations:
- Ultrasound – If we have it, there is no reason we should not be using it. Approximately one-third of nerve blocks fail by landmark alone, compared to a >95% success rate by using trained US-guidance (Perlas, 2008; Redborg, 2009; Sohoni, 2016).
- Stay low, go slow – Use the lowest possible dose of anesthetic (see above); start with slow, incremental injections of 3–5 ml and always aspirate (to assess for blood) prior to injecting.
- Watch the tip – Do not advance the needle or inject without visualization of the needle tip; If you are injecting and you do not see the anechoic balloon, stop immediately and find your tip.
- Do your math – Use readily available weight-based dosing charts for commonly used anesthetics.
- Constrict for extra caution – Each anesthetic can be administered with epinephrine, which assists anesthetic effect by inducing local vasoconstriction, preventing anesthetic washout. Accidental intravascular injection of anesthesia with epi which will cause immediate tachycardia, tipping you off to early toxicity.
- Prepare for the worst – Cardiac monitoring and secure IV access is strongly recommended for all USGNBs (as previously discussed, unnecessary with low-volume peripheral blocks).
- Beware of red flags – Watch for auditory changes, perioral numbness, metallic taste, → agitation → seizures, coma. Symptoms typically occur 1 to 5 min post-injection but can be delayed.
- Initial cardiac excitation (hypertension, tachycardia and/or ventricular dysrhythmia) can be followed by cardiac depression (bradycardia, decreased contractility, conduction blocks, asystole). Any fluctuation in vital signs should be a red flag.
What do I do if I suspect LAST?
- Find your ‘fat raft’ – Know where lipid emulsion is (kept in the ED pyxis or “block cart”) and how to use it (when patient is seizing or going into cardiac arrest is not the time to be googling this) – administer 5 ml/kg bolus with a continued infusion of 0.25 ml/min. If patient is seizing, consider benzodiazepines as well.
- **For a great review of LAST, see REBEL EM, May 2017 – Local Anesthetic Systemic Toxicity (LAST) or LITFL – Local Anesthetic Toxicity).
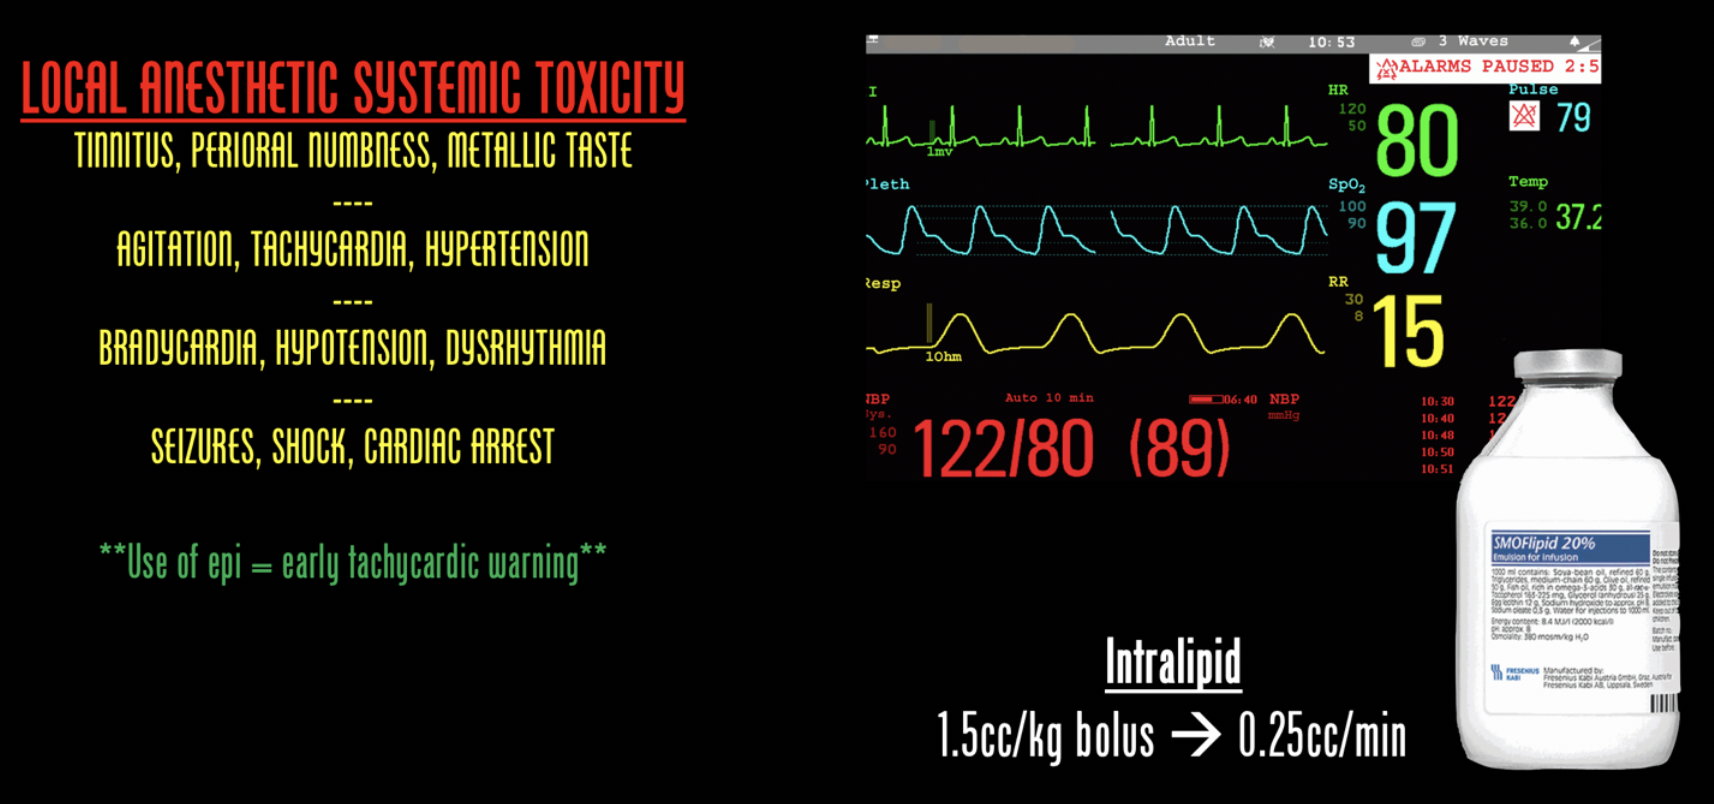
LAST. Be aware of the ‘red flags’ and progression of signs/symptoms associated with systemic toxicity. Consider using a cardiac monitor when performing nerve blocks and be aware of where intralipid exists in your emergency department should the need arise.
If I have to worry about LAST, should I have all these patients on the monitor?
In a March, 2019 episode of EMRAP on nerve blocks, nerve-block guru Mike Stone says not necessarily. He argues that LAST is quite rare, and although this should be standard practice for the larger-volume central blocks such as a femoral nerve block and those closer to central circulation, peripheral extremity blocks using ultrasound guidance, proper technique, and dose calculations may be safe without monitoring. When in doubt (particularly with beginners), go with a monitor.
How do I learn to do nerve blocks without practicing on patients?
Start with a simulation model to build confidence. For those of you at a well-funded emergency program or with more money than you know what to do with, there are great block simulators available that range between a couple hundred dollars to a couple thousand dollars. For the rest of us, there are a number of low-cost ‘do it yourself’ options available. Some like balloons and pork loins for the tissue consistency. Vegetarians (and Italians) may be more into a polenta model. Some have also suggested gelatin models. Whatever option you choose, simulation prior to practicing on patients is a great way to develop procedural comfort and hand dexterity for when it comes time to perform an actual block.
Upshot
Nerve blocks are a great analgesic tool to have in our armamentarium but we can’t forget safety.
- Stay sterile: Single-use gel packs, sterile glove probe covers, chlorhexidine pre-scrub.
- Be safe: Know your anesthetic dosing and different anesthetic options; use good technique – watch your tip, avoid injecting against resistance, stick to fascial planes to avoid vasculature; be aware of complication – peripheral nerve injury, acute compartment syndrome, LAST; be prepared – know where Intralipid is when you need it and the specific dosing based on patient weight.
- Practice: Consider a do-it-yourself model for beginners looking to pick up this USGNB practice.
Finally, remember that blocks are an analgesic bridge. It is important to set expectations with the and recognize that blocks can take up to 45 min to take full effect. If early manipulation or pain control is required, consider bridging analgesics to cover patient while the nerve block takes effect.
Further Resources:
- Highland Ultrasound (the best resource out there) – US-guided ED Pain Management
- Neuraxiom – Regional Guided Nerve Blocks
- ACEP – How To Implement an Ultrasound Nerve Block Cirriculum
- WikEM – Regional Nerve Blocks