Authors: Marc Zosky, DO (LSUHSC Emergency Medicine Residency, Chief Resident, Baton Rouge, LA) and Emilio Volz, MD (LSUHSC Emergency Ultrasound Fellowship Director, Baton Rouge, LA) // Edited by: Alex Koyfman, MD (@EMHighAK, EM Attending Physician, UTSW / Parkland Memorial Hospital) and Stephen Alerhand, MD (@SAlerhand)
Obtaining intravenous (IV) access is a basic necessity in the emergency department. So what do you do when you are unable to place a peripheral IV, and your go-to external jugular line is not an option? You certainly do not want to place an IO in a stable patient, and you definitely want to avoid placing a time-consuming and potentially dangerous central line.
Ultrasound guided peripheral IVs are quickly becoming the standard of care for patients with difficult IV access. This article will review the skills needed for successful placement.
Step 1: Prepare & position
First, gather all your materials and have them arranged for easy access. You will need a tourniquet, skin cleaning solution, angiocatheter, IV tubing, saline flush, and bandage to secure the newly placed IV. We recommend you use an angiocatheter which is long enough for at least 1/3 of the catheter to sit inside the selected vessel as this will increase the longevity of your line’s functionality. There are many “long” 1.8 – 2 inch commercially available products made for this purpose. Twenty gauge or larger catheters, graded for power injection, are usually easily visualized under ultrasound guidance. Position the patient to maximize both operator and patient comfort. One common novice mistake is forcing yourself to lean over and sit/stand in a position that may cause fatigue or back straining quite quickly. If your ultrasound machine has a high frequency vascular probe, it will facilitate visualization of superficial vessels. Make sure to follow your own institutional recommendations regarding peripheral IV placement.
Step 2: Find a vein
Start scanning in the short axis view until you see the largest and most superficial vein available. Practice scanning with your non-dominant hand. When placing lines, you should use your dominant hand to drive the needle and your non-dominant hand to scan. Once visualized, scan a few centimeters proximally and distally to see the direction in which the vein courses. You do not want to insert an IV into a vein that changes angle acutely. Also, evaluate the vessel for abnormalities. If the vessel is not compressible or has a hematoma around it, find a different site.
Step 3: Make sure your vein… well, is actually a vein
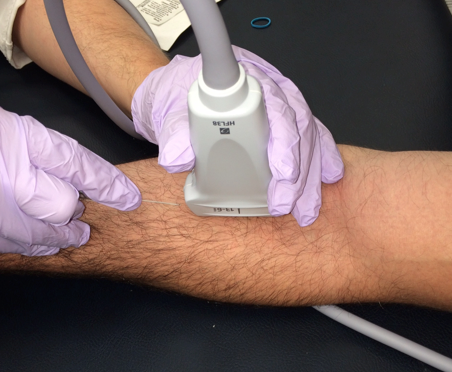
How do you determine the vessel you are looking at is actually a vein? There are many techniques; however, we recommend two methods. First, compress the vessel. Arteries typically continue to pulsate, while veins should easily collapse with minimal pressure (Video 1). Remember that with sufficient pressure one can completely occlude an artery. If you are still not sure, we recommend using spectral Doppler (the one which gives you a waveform (Figure 1). Arterial waveforms will be peaked when compared to the flat waveform of peripheral veins.
Video 1. Observe the easily compressible vein. There is an adjacent artery which is seen pulsating.
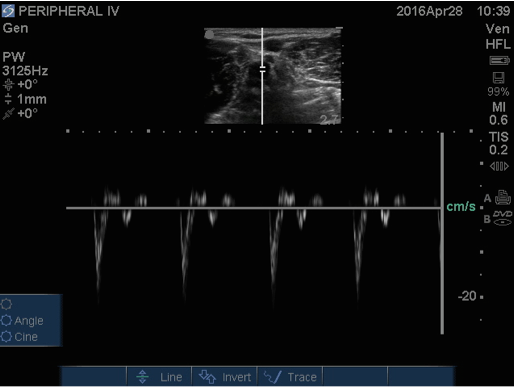
Figure 1. Spectral doppler of an artery, showing peaked waveforms.
Step 4: Cannulate the vessel
Now that you have found an easily compressible vein in the short axis view, turn the probe 90 degrees to get the long axis view (Figures 2, 3). We believe that a long axis approach is safer and helps to develop ultrasound techniques necessary for safe central line cannulation as well. Ideally, learn to use both long and short axis approaches, making sure to visualize the needle tip all the way through. Advance the catheter under direct visualization until you see the catheter (not just the needle) tip in the vessel (Videos 2, 3). As needed, level off your angle with the skin to maximize the amount of catheter in the vessel before you advance. At this point, let go of the ultrasound probe and advance the catheter into the vessel until it is hubbed at the skin. The catheter should advance easily. If there is resistance, the catheter may not be in the vessel. If this is a possibility, do not force it. Some catheters have a wire within them which can be used to guide the catheter in the vessel. If you are using one of these catheters, you may not get flash when accessing the vessel and should confirm wire position in the vein before advancing the catheter. Once this step is completed, secure the IV in place and get ready to confirm placement.
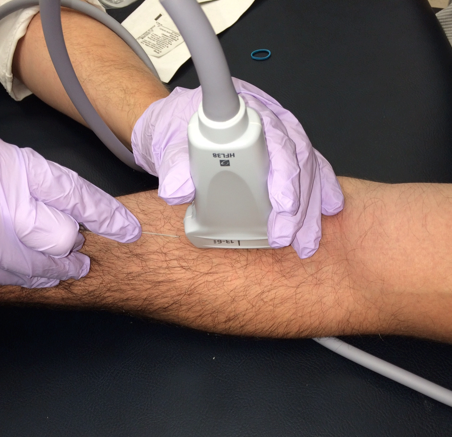
Figure 2. Proper positioning for cannulating the vein in the long axis.
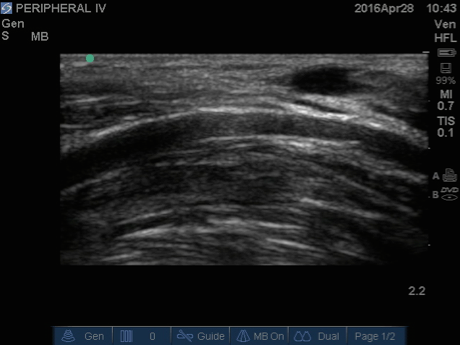
Figure 3. Visualization of the vein in the long axis.
Video 2. Under direct ultrasound visualization in the long axis, the needle is seen making contact with the vein.
Videos 3. The needle is slowly advanced until it enters the vein.
Step 5: Confirm placement
Just because your angiocatheter chamber filled with dark blood, and you saw your needle tip make contact with the vein, this does not mean you are necessarily secured in a good position in the vein. How do you check? First, scan the vein in the long axis and visualize the catheter inside the vein (Video 4). Second, under ultrasound guidance inject 10cc of normal saline, and you can directly visualize turbulence within the vein (Video 5).
Videos 4. Long axis view visualizing the majority of the catheter in the vein.
Videos 5. Long axis view of a 10cc saline injection, showing turbulence within the vein.
References/Further Reading
- Costantino, Thomas G. et al. Ultrasound-Guided Peripheral Venous Access vs. the External Jugular Vein as the Initial Approach to the Patient with Difficult Vascular Access. Journal of Emergency Medicine. 2010;39:462-467
- Costantino, T.G., Parikh, A.K., Satz, W.A., Fojtik, J.P. Ultrasonography-guided peripheral intravenous access versus traditional approaches in patients with difficult venous access. Ann Emerg Med. 2005;46:456–461.
- Gregg, SC, Murthi SB, Sisley AC, et al. Ultrasound-guided peripheral intravenous access in the intensive care unit. J Crit Care. 2010;25:514-519.
- Stein J, George B, River G, et al. Ultrasonographically guided peripherall intravenous cannulation in emergency department patients with difficult intravenous access: a randomized trial. Ann Emerg Med. 2009;54:33-40.


3 thoughts on “Ultrasound-Guided Peripheral Intravenous Access – Tips for Success”
This is a GREAT post! I use this skill every chance I get, I like eliminating the “guessing” process. While I am short-axis guy myself, I have a difficult time taking the time to learn or teach the long-axis approach. I just have to try this approach on my next IV request. Thanks for writing such a concise post.
Excellent videos with straight-forward descriptions in this post, made it extremely easy to visualize your technique! Thanks!
Glad the videos were well received. In our patient population in Baton Rouge, LA, we see an ever growing amount of patients with very challenging IV access (obesity, multiple visits with large history of peripheral access, hemodialysis patients with limited sites, etc), so this is becoming truly essential in many patients. What has worked well in our department is that we started training the nurses, who love the extra skills. The skilled nurses then teach it to the other nurses, so there are typically multiple people in the department besides the physicians who can perform this.