Author: Tim Montrief, MD (@EMinMiami) (University of Miami/Jackson Memorial Hospital Emergency Medicine Residency Program) // Reviewed by Anthony DeVivo, DO (EM-Critical Care Medicine Fellow, Icahn School of Medicine at The Mount Sinai Hospital), Alex Koyfman, MD (@EMHighAK), Brit Long, MD (@long_brit) and Manpreet Singh, MD (@MprizzleER)
Today’s Unlocking Common ED Procedures post looks at using micropuncture kits for difficult vascular access.

Check out our new downloadable procedure card with QR code link to the article. Print them out and be ready to go over it with your learners!
Case
A 42-year-old woman with a history of obesity, end stage liver disease with significant ascites presents two days after an outpatient endoscopy. She complains of increasing ascites, difficulty breathing, and diffuse abdominal pain. Her heart rate is 104 beats per minute, she has an oxygen saturation of 90% on room air, and hypotension with a blood pressure of 90/40 mm Hg. Her abdominal exam is notable for diffuse moderate tenderness with mild guarding with significant ascites but no evidence of peritoneal signs. Her labs are notable for worsening liver failure and coagulopathy, with severe thrombocytopenia. Your colleagues are unable to gain peripheral vascular access and a decision is made to place a central venous catheter. Are there any techniques available to make line placement safer in this patient?
Background
The ability to obtain rapid vascular access, both arterial and venous, is a critical skill in emergency medicine, made even more important by recent advances in resuscitation technology.1 Patients may require placement of a central venous catheter, arterial line, REBOA, PICC line, midline, or ECMO cannulas while in the emergency department. The Seldinger technique is the foundation of most intravascular procedures and can be utilized for all types of vessel catheterization.2 The methodology has evolved over the past several decades and is now performed with or without ultrasound guidance.3 While there has been progress with needle guidance systems, and the evolution of the “accelerated seldinger technique” (use of preassembled kits combining a needle, guidewire, dilator, and sheath into one unit), the fundamental technique remains unchanged.4
Emergent vascular access can often become challenging because of the patient’s body habitus, anatomical deformities, agitation or altered mental status, intravascular volume depletion, and hemodynamic status. These challenges can make an otherwise routine procedure into a lengthy and complicated one that exposes the patient to multiple needle sticks, increasing the rate of complications (e.g., pneumothorax, vascular and nerve injuries, hemorrhage, or hematoma formation).5,6 One of the major risks for access site bleeding is multiple or posterior wall punctures with a large needle.7
The recent advent and widespread use of micropuncture needles has revolutionized vascular access; they have been used widely, mostly by interventional radiologists, cardiologists, and vascular surgeons. These kits utilize a very small needle (21 gauge) to obtain initial access which should reduce the risk of bleeding despite multiple or posterior vessel wall punctures, and may be better tolerated by patients because of their smaller diameter.8 Furthermore, the use of micropuncture kits can help obtain large bore peripheral venous access in patients with poor peripheral veins, mitigating the likelihood of venous rupture.9The micropuncture needle’s echogenic nature improves visualization with ultrasonography, providing the most benefit for patients with small vascular structures or aberrant anatomy. In short, the use of echogenic micropuncture needles is a vital skill for the emergency physician, and can be beneficial when placing peripheral IV or arterial catheters in challenging cases, although little literature has been published in this area.10–12 This technique may improve the success rate of vascular access in difficult patients, decrease the rate of immediate complications, minimize the number of procedural attempts, shorten procedure time, and may improve patient safety, comfort, and satisfaction.13,14
The Micropuncture Kit
While there are many commercially available micropuncture kits, they all share similar components (Figure 1):
- An echogenic small-bore needle, usually 21 gauge
- A wire (usually .018″) that can pass down the needle, with an atraumatic tip
- A microcatheter, consisting of a dilator and introducer sheath, generally 4 or 5 French

Figure 1. Generally a micropuncture kit has 3 major components- A micropuncture needle (21 gauge), a microwire, and a microcatheter pictured above. The kit above and in the video below is the Micropuncutre Introducer Set that is manufactured and sold by Cook Medical (REF: G47944). Picture courtesy of Stepwards Blog
What’s it for?
Anything you’d use the seldinger technique for- vascular or body cavity access.15
How’s it used?
- The micropuncture needle is used to cannulate a vessel under ultrasound guidance.
- The small wire is passed through the needle by usual Seldinger technique, and the needle removed, leaving the micropuncture wire in the vessel.
- The dilator/introducer sheath is railroaded over the micropuncture wire, typically to the hub. The central stiffening dilator is unlocked, and is removed simultaneously with the wire, leaving the introducer sheath in the vessel. This is similar to the technique used for the larger percutaneous introducer placement (Figure 2).
- The micropuncture kit introducer sheath is large enough to pass the full-sized wire from a central line kit (usually .035″). After passing the full-sized wire and removing the micropuncture introducer sheath, you can then place the full-sized dilator and introduce your central line in the usual fashion.
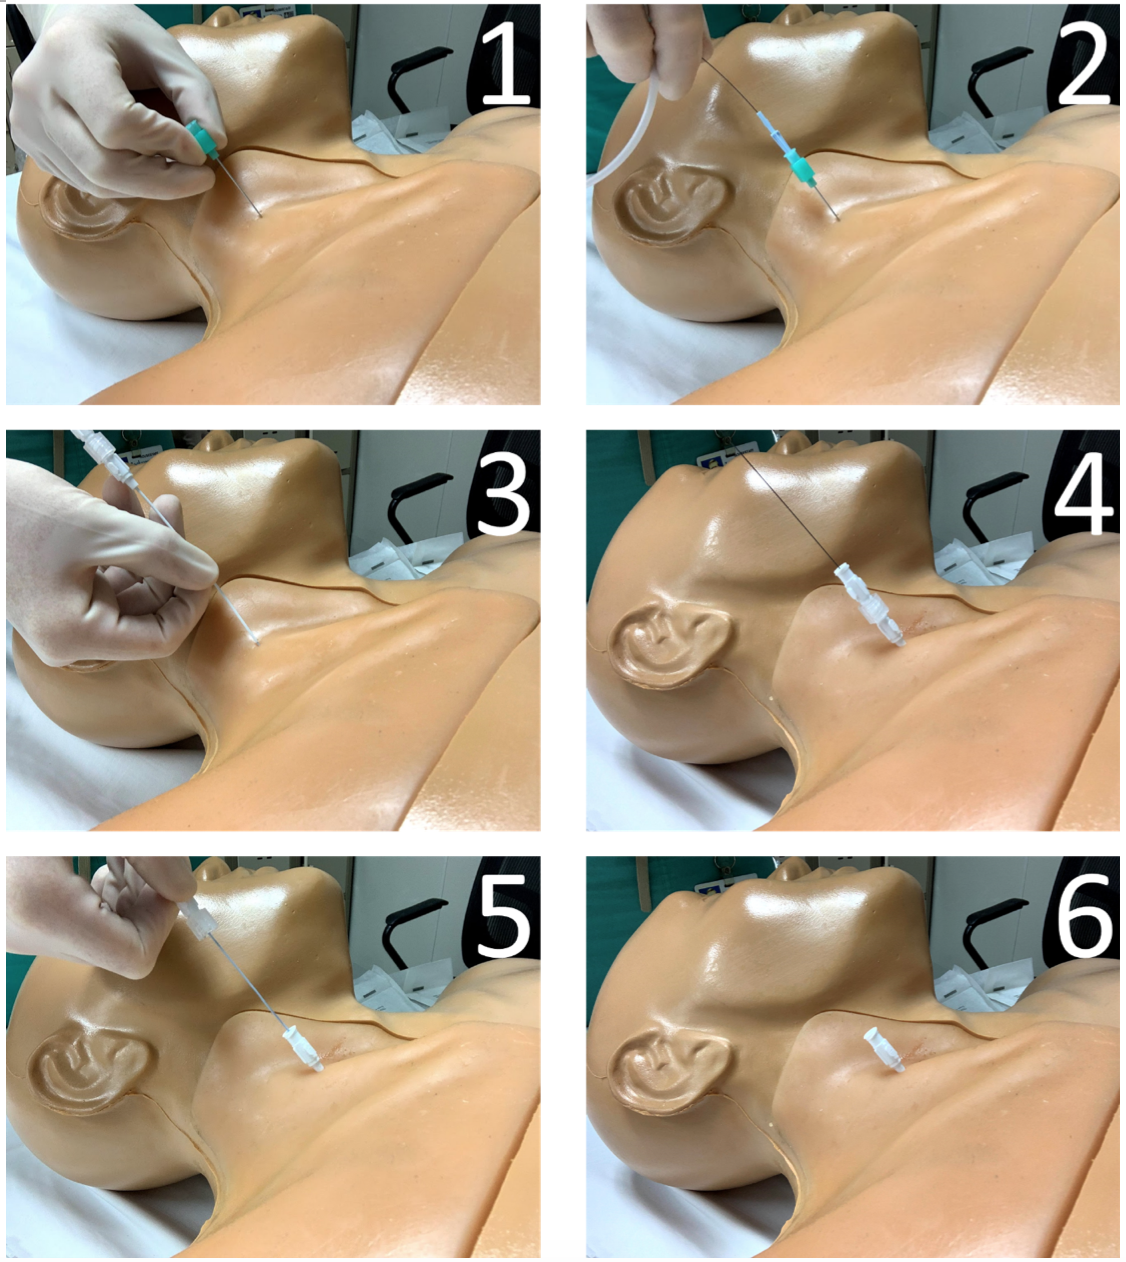
Figure 2. Micropuncture technique for vascular access. 1. The micropuncture needle is used to cannulate a vessel (typically under ultrasound guidance). Note the technique used to grasp the needle without an aspirating syringe, which improves dexterity. 2. The microwire is passed through the needle by usual Seldinger technique, and the needle removed, leaving the micropuncture wire in the vessel. 3-4. The microcatheter dilator/introducer sheath is railroaded over the micropuncture wire, typically to the hub. 5-6. The central stiffening dilator is unlocked, and is removed simultaneously with the wire, leaving the introducer sheath in the vessel.
Step-by-step video of how to use the micropuncture kit courtesy of Stepwards blog, “How To Use The Micropuncture Kit”.
The above procedure is essentially the normal Seldinger technique, with the additional step of upsizing from the micropuncture needle and wire. But when should we use the micropuncture kit? The traditional approach requires the initial needlestick with an introducer large enough to pass the full-sized guidewire, which may be bigger than you’d like to use when faced with certain patients- those with coagulopathies, difficult anatomy, or hypotension, to name a few.1 By starting with an extremely small, echogenic needle (no bigger than you use to infiltrate local anesthetic), you limit the harm of accidental perforations.
In the hands of a skilled emergency physician, the micropuncture kit allows for fine, detailed movements when obtaining vascular access.13 Compared to the crude, large-bore introducer needle, it is a subtle, sophisticated kit. If an expert user is in the midst of a challenging vascular procedure, an ultrasound probe should be in one hand, and a micropuncture needle should be in the other. To quote another micropuncture supporter, “It’s the lightsaber to a blaster, the bougie to a styletted tube, and the TEG to an INR.”15 Below are just a few areas where the micropuncture kit can improve your practice.
High-Risk Vascular Access
Emergency providers routinely obtain vascular access in critically ill patients, at high risk for immediate procedural complications, including hemorrhage, hematoma formation, misplacement into another vessel, vessel laceration or dissection, air embolism, thrombosis, and pneumothorax.12 In the acute care world, patients who need vascular access often need them despite being sick, if not as a direct consequence of it. But, the safety of these procedures can be optimized. The most experienced operator should perform the procedure, real-time ultrasound guidance should be used, and all potential access sites should be considered.1,5 During the procedure, under ultrasound guidance, the operator should use a single puncture technique, visualizing the needle at all times in order to prevent soft tissue and vessel wall trauma.1 The micropuncture kit should be used for all high-risk vascular access procedures, including in patients with coagulopathy (INR ≥1.5, platelet count ≤100 × 109/L, difficult anatomy (requiring more than three needle passes into the vessel), presence of ascites, use of the landmark technique, and hypotension.5,13,16,17 While its use may not reduce incidental bleeding or vessel wall trauma per se, it will provide a margin of safety given its small size, and may help reduce pseudoaneurysm formation.8 For instance, if you happen to puncture the back wall of a vessel during the procedure, the micropuncture needle hole will be tiny, and less likely to result in serious complications, including hemorrhage.12,18
However, while the micropuncture needle adds a degree of safety to the procedure, this is lost if you cannulate the wrong vessel (e.g. an artery) with the micropuncture dilator/introducer sheath and proceed to upsize with another dilator, say from a central line kit. When in doubt, fluid column manometry should be performed after the micropuncture dilator and wire are removed, with the micropuncture introducer sheath in place, unless you are so concerned that even the small dilation step with the micropuncture kit seems unwise.19
Improving Peripheral Access
Additionally, the micropuncture kit may obviate the need for central access in certain high-risk patients altogether. This is especially true with an increasing body of literature supporting the placement of midline and PICC catheters by emergency physicians.20–22 A similar technique has been described in which micropuncture kits are used to obtain reliable large-bore (14 gauge) peripheral venous access in patients with poor peripheral veins.9 Using micropuncture needles with dilator/introducer sheaths allows for a less-traumatic cannulation of peripheral veins, reducing venous rupture and intravenous failure that can frequently occur with standard catheter-over-needle systems.9 Ultimately, the micropuncture technique provides a safe alternative to central venous cannulation when volume resuscitation is expected. Reliable peripheral access has been shown to reduce the number of central venous catheter placements, and the micropuncture technique could potentially assist in the placement of difficult catheters.18 Additionally, this technique appears to offer angiographers and patients a quicker and perhaps safer alternative than conventional upsizing to catheters with larger lumens when using the introducer sheath for intravenous contrast administration.19 However, due to the lack of rigorous studies, additional experimental and clinical trials are necessary to fully endorse this in clinical practice.
Improving access to body cavities
Micropuncture kits can be used to access body cavities, especially when a drainage catheter is indicated, particularly in paracentesis, thoracentesis, suprapubic catheter placement, and pericardiocentesis.7 The biggest benefit may be seen in patients needing pericardiocentesis, as potential complications include ventricular puncture, cardiac laceration, arrhythmias, and damage to nearby organs, including the lungs, liver, and spleen.23 These risks can be reduced using micropuncture as an accidental puncture with a small needle is less hazardous, and the echogenic nature makes it more visible during the procedure.7 The micropuncture technique is helpful in limiting iatrogenic pneumothorax associated with thoracentesis, and can be effective in the placement of peritoneal catheters for dialysis.6
Troubleshooting: Wielding the Wire
The micropuncture kit’s wire alone is beneficial in many difficult vascular access scenarios. Many of the guidewires are made from nitinol madrel, with a minority made from stainless steel. The nitinol wire has better kink resistance than the larger wound stainless steel guidewires found in many central line kits, and is more difficult for the sheath dilator to overcome, giving the operator more control. The micropuncture guidewire is small enough to fit inside a wide array of cannulas, is gentle and atraumatic, and is available without opening up a larger, more expensive kit. The micropuncture wire improves trackability- the ability of the wire to follow the tip down a vessel, especially through curves of tortuous vessels.24 Less stiff, floppy nitinol wires can navigate these sharp bends much easier than stiff stainless steel wires.24
The characteristics of the micropuncture wire make it an ideal rescue device when faced with many common situations, for instance, when placing a radial arterial line using one of the ubiquitous retained-wire seldinger kits. Occasionally, when the catheter is threaded over the wire and the needle is removed, no flow is present. Withdrawing the catheter yields arterial flow, signaling that you penetrated the artery through-and-through, and leaving you with a partially threaded cannula with no way to re-advance it into the artery. This is an excellent opportunity to utilize the micropuncture wire. With your catheter positioned to yield pulsatile flow, insert the nitinol wire, which should enter the vessel without difficulty. Then you can advance the catheter to the hub, placing it fully inside the artery, after which the wire can be removed.
This rescue technique is not limited to arterial lines, but can be used for peripheral IVs, midlines, and PICC lines, which often encounter the same difficulties. This same kit can be used to completely replace peripheral cannulas by the rewire technique, although this should be done with caution. It is rare that peripheral IVs, midlines, and radial arterial cannulas can be successfully rewired, as they typically fail secondary to the formation of a stiff fibrin sheath around the catheter. Rewiring and placing a new cannula into this sheath does not fix the underlying cause of the failure.
One must be careful when using the wire as a rescue device. The micropuncture wire should never be placed backwards through the cannula (which is commonplace when using the full-sized guidewires), as the back end is stiff and will cause trauma to the vessel.
Troubleshooting: Wielding the needle
Even for patients who are not high risk for immediate complications during vascular procedures, the micropuncture needle may be useful. It is small, sharp, echogenic, and very precise, allowing access to smaller arteries and veins. If used without an aspirating syringe, the needle becomes more maneuverable and dexterous, allowing precise placement during the procedure. Potential indications include patients who have overlapping or vessels that lie in close proximity to one another, requiring precise cannulation technique without backwalling the vessel.
Pearls & Pitfalls
- When placing peripheral IVs, midlines, and arterial lines, use the microneedle and wire, but not the dilator. Simply place the desired catheter directly over the wire as you would the dilator/introducer sheath. While this may cause a bit of resistance and associated discomfort for the patient, it should pass with patience and gentle twisting pressure at the skin surface. Dilating these vessels, particularly arteries, may be unnecessary and unsafe if the final catheter is smaller than the micropuncture introducer sheath.
- You can consider placing the micropuncture introducer sheath in place as a short-term catheter, but this is generally considered unwise, as the introducer sheath is more rigid compared to other cannulas, and may cause vessel damage as the patient moves.
- The micropuncture needle is thin and is easily bent by thick skin or bone. Careful advancement through skin or utilizing a two-handed technique may help the needle retain its shape. If you are performing a landmark-guided subclavian line, this should be kept in mind.
- Confirming intravascular placement is difficult with the small needle; aspirating blood will be slower and have more resistance than a larger needle. This is to be expected.
- Be careful dumping these kits onto the sterile field, as they tend to scatter themselves everywhere.
- Using the micropuncture needle without an aspirating syringe can make it more maneuverable for the operator.
- The micropuncture wire should never be placed backwards through the cannula (which is commonplace when using the full-sized guidewires), as the back end is stiff and will cause trauma to the vessel.
- Because the luminal diameter of the micropuncture needle is much smaller than the traditional 18-gauge needle, the blood return is less brisk, and it is sometimes hard to see blood pulsation, especially in hypotensive patients leading to uncertainty of whether the needle is in an artery or vein. When in doubt, fluid column manometry should be performed.
Rapid Procedure Review – Micropuncture Technique for Central Venous Access
- Position the patient appropriately for vascular access site
- Assess the anatomy under ultrasound bilaterally to assure the safest site is utilized.
- Sterile preparation of the procedure site and the proceduralist.
- Drape patient.
- Prepare sterile ultrasound probe cover.
- Prepare vascular access catheter kit
- Anesthetize insertion site by first making a wheel of lidocaine at the site and then injecting lidocaine throughout the subcutaneous and deep tissues under ultrasound guidance.
- Under ultrasound guidance, insert micropuncture needle through the skin and advance towards the internal jugular vein via the tract of lidocaine previously made.
- Always keep the needle tip in view under ultrasound.
- Once flow is obtained within the syringe, drop the angle of the needle and reconfirm blood flow.
- Remove syringe from micropuncture needle and advance the microwire.
- Once the wire is within the vessel, remove the needle over the wire and confirm placement of the wire under ultrasound.
- Railroad the microcatheter dilator/introducer sheath over the micropuncture wire, typically to the hub.
- Unlock the central stiffening dilator, and removed it simultaneously with the microwire, leaving the introducer sheath in the vessel.
- Confirm correct vessel placement using fluid manometry.
- Advance the central line kit wire (generally 0.035”) through the introducer sheath and remove the sheath.
- Make a small nick of a #11 scalpel with the blade facing away from the midline.
- Advance dilator over the wire with the intention of dilating the soft tissue but not the vessel. This depth of dilation will be dependent on body habitus and anatomy which should be taken into account when assessing the anatomy under ultrasound.
- Advance the catheter over the wire and carefully feed the wire back through the catheter once at the skin to assure control of the wire before catheter advancement into the vessel.
- Once the catheter is within the vessel, remove the wire completely.
- Cap the third port from which the wire was removed.
- Flush all 3 ports.
- Secure line with suture.
- Apply antibiotic patch and sterile dressing.
Conclusion
As emergency physicians perform percutaneous vascular access procedures on critically ill patients daily, it is critical to reduce the complications associated with these procedures. A meticulous approach incorporating ultrasound guidance throughout the procedure is essential to reduce complications, including hemorrhage and organ injury. However, complications still occur. The routine use of the micropuncture technique has the potential to reduce adverse events with no disadvantages, and can be used in a variety of scenarios, as described above. The micropuncture technique is simple, intuitive, and causes less trauma, preventing disastrous complications. Although using this technique may take a few extra minutes as compared with the standard technique, it is time and money well spent if even one major complication can be avoided.
References
- Lewis GC, Crapo SA, Williams JG. Critical skills and procedures in emergency medicine: vascular access skills and procedures. Emerg Med Clin North Am. 2013;31(1):59-86. doi:10.1016/j.emc.2012.09.006
- Kerforne T, Petitpas F, Frasca D, Goudet V, Robert R, Mimoz O. Ultrasound-guided peripheral venous access in severely ill patients with suspected difficult vascular puncture. Chest. 2012;141(1):279-280. doi:10.1378/chest.11-2054
- Weiner MM, Geldard P, Mittnacht AJC. Ultrasound-guided vascular access: a comprehensive review. J Cardiothorac Vasc Anesth. 2013;27(2):345-360. doi:10.1053/j.jvca.2012.07.007
- Thaut L, Weymouth W, Hunsaker B, Reschke D. Evaluation of Central Venous Access with Accelerated Seldinger Technique Versus Modified Seldinger Technique. J Emerg Med. 2019;56(1):23-28. doi:10.1016/j.jemermed.2018.10.021
- Patel AR, Patel AR, Singh S, Singh S, Khawaja I. Central Line Catheters and Associated Complications: A Review. Cureus. 2019;11(5):e4717. doi:10.7759/cureus.4717
- Scheer B, Perel A, Pfeiffer UJ. Clinical review: complications and risk factors of peripheral arterial catheters used for haemodynamic monitoring in anaesthesia and intensive care medicine. Crit Care Lond Engl. 2002;6(3):199-204. doi:10.1186/cc1489
- Murarka S, Movahed MR. The use of micropuncture technique for vascular or body cavity access. Rev Cardiovasc Med. 2014;15(3):245-251.
- Gutzeit A, Schoch E, Reischauer C, Hergan K, Jenelten R, Binkert CA. Comparison of a 21G micropuncture needle and a regular 19G access needle for antegrade arterial access into the superficial femoral artery. Cardiovasc Intervent Radiol. 2014;37(2):343-347. doi:10.1007/s00270-013-0669-0
- Bowman MC, Maracaja Neto LF. Micropuncture Kits to Obtain Large-Bore Peripheral Venous Access. J Cardiothorac Vasc Anesth. 2018;32(2):e42-e43. doi:10.1053/j.jvca.2017.07.017
- Gilchrist IC. It is more than the size of the tool that matters. Catheter Cardiovasc Interv Off J Soc Card Angiogr Interv. 2012;79(7):1186-1187. doi:10.1002/ccd.24457
- Ben-Dor I, Maluenda G, Mahmoudi M, et al. A novel, minimally invasive access technique versus standard 18-gauge needle set for femoral access. Catheter Cardiovasc Interv Off J Soc Card Angiogr Interv. 2012;79(7):1180-1185. doi:10.1002/ccd.23330
- Shah H, Bansal A, Srinvasan V, Gradman A, Dua A. Vascular Access Site Bleeding Complications with Micropuncture Needle in Patients Undergoing Cardiac Catheterization: A Comparison with Conventional Cook Needle. Catheter Cardiovasc Interv Off J Soc Card Angiogr Interv. 2006;67:826-827.
- Castillo D, McEwen DS, Young L, Kirkpatrick J. Micropuncture needles combined with ultrasound guidance for unusual central venous cannulation: desperate times call for desperate measures–a new trick for old anesthesiologists. Anesth Analg. 2012;114(3):634-637. doi:10.1213/ANE.0b013e3182411c4e
- Lee JH, Hwang SD, Song JH, et al. Placement of tunneled cuffed catheter for hemodialysis: Micropuncture kit versus Angiocath IV catheter. J Vasc Access. 2019;20(1_suppl):50-54. doi:10.1177/1129729818777963
- Oto B. Hail the mighty micropuncture. Crit Concepts Medit Crit Illn. May 2018. http://critcon.org/archives/501.
- Britt RC, Novosel TJ, Britt LD, Sullivan M. The impact of central line simulation before the ICU experience. Am J Surg. 2009;197(4):533-536. doi:10.1016/j.amjsurg.2008.11.016
- van de Weerdt EK, Biemond BJ, Baake B, et al. Central venous catheter placement in coagulopathic patients: risk factors and incidence of bleeding complications: CVC PLACEMENT IN COAGULOPATHIC PATIENTS. Transfusion (Paris). 2017;57(10):2512-2525. doi:10.1111/trf.14248
- Ambrose JA, Lardizabal J, Mouanoutoua M, et al. Femoral Micropuncture or Routine Introducer Study (FEMORIS). Cardiology. 2014;129(1):39-43. doi:10.1159/000362536
- Ezaru CS, Mangione MP, Oravitz TM, Ibinson JW, Bjerke RJ. Eliminating arterial injury during central venous catheterization using manometry. Anesth Analg. 2009;109(1):130-134. doi:10.1213/ane.0b013e31818f87e9
- Cotogni P, Pittiruti M. Focus on peripherally inserted central catheters in critically ill patients. World J Crit Care Med. 2014;3(4):80-94. doi:10.5492/wjccm.v3.i4.80
- Spiegel RJ, Eraso D, Leibner E, Thode H, Morley EJ, Weingart S. The Utility of Midline Intravenous Catheters in Critically Ill Emergency Department Patients. Ann Emerg Med. 2020;75(4):538-545. doi:10.1016/j.annemergmed.2019.09.018
- Scoppettuolo G, Pittiruti M, Pitoni S, et al. Ultrasound-guided “short” midline catheters for difficult venous access in the emergency department: a retrospective analysis. Int J Emerg Med. 2016;9(1):3. doi:10.1186/s12245-016-0100-0
- Gunda S, Reddy M, Pillarisetti J, et al. Differences in complication rates between large bore needle and a long micropuncture needle during epicardial access: time to change clinical practice? Circ Arrhythm Electrophysiol. 2015;8(4):890-895. doi:10.1161/CIRCEP.115.002921
- Fornell D. Understanding the Design and Function of Guidewire Technology. Diagn Interv Cardiol. October 2016. https://www.dicardiology.com/article/understanding-design-and-function-guidewire-technology.